Using a BVM *properly* is, without a doubt, one of the most challenging tasks we perform in EM, EMS, and critical care. Most providers do not get enough initial training or ongoing practice. Perhaps the biggest factor that makes people do this poorly is the sympathetic surge experienced while ventilating a patient. This leads to lack of focus on the task and poor quality ventilation. It requires calm and collected performance when the brain is anything but. The person ventilating must be absolutely focused on that task and not distracted by other issues. Its not all our fault though. The BVM is really nothing more than a bellows reshaped to fit on people’s face, not the most advanced device.
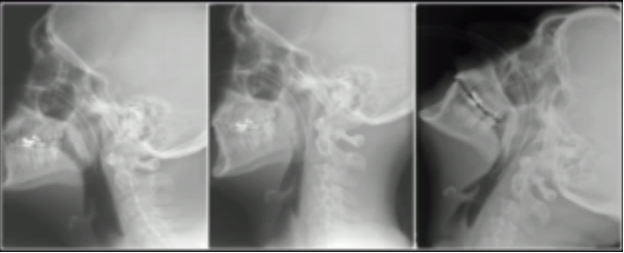
-The first step to good BVM technique is properly positioning the patient. See my last post here for information on that topic.-
1. The Mask Seal
A good mask seal is essential for allowing the BVM to work at its full potential. Leaks lead to inadequate ventilation and loss of airway pressure between breaths. There are a few ways to maintain an adequate seal. Please note: the mask seal should be maintained at all times and not interrupted in between breaths. This allows the maintenance of airway pressure even during exhalation and between breaths. It is important to maintain airway pressure. Oxygenation is maximized with increased mean airway pressure.
When performing one-person BVM you can use the C-E grip to maintain a jaw thrust and mask seal. The non-dominant hand should be used to maintain a seal. The thumb sits on the nose side of the mask and the index finger wraps around the bottom of the mask. The other three fingers are placed on the jaw bone with the pinky at the back of the jaw. These fingers should pull the jaw forward maintaining a jaw thrust. The fingers on the mask should be used to help maintain the seal and minimize leaks. It may help to use the bag portion of the BVM as a lever to provide more mask seal on the side of the mask that is not being held. The bag can be pushed downward resulting in the mask being pressed into the face more on that side.
 The optimal way to perform BVM ventilation is with two providers. A mask seal is held with both hands by one provider and the other squeezes the bag. When maintaining a mask seal with two hands a double C-E grip can be used. This allows both hands to be used for displacing the jaw forward and results in significantly improved mask seal. Another, often more effective, technique is placing the palms of both hands on the sides of the mask then using the index and other fingers to pull the jaw forward. This method may be preferred in difficult BVM situations. Maintaining a jaw thrust is essential to maximizing oxygenation. Otherwise the airway obstructs and prevents air passage.


2. Squeezing the bag
This part is important and can really make your patients worse if it is done poorly. The typical adult BVM has a volume of 1.0-1.2 liters. The tidal volume desired is usually about half of that. This means that you DO NOT need two hands to squeeze the bag. One hand is plenty sufficient and, in most cases, you can use two fingers. Only enough volume to cause chest rise and ETCO2 return is needed. Some people say to even use a pediatric BVM for adults because it is much closer to the actual tidal volume necessary. If the patient is spontaneously breathing simply augment the patient’s own breaths with a small volume. So why is volume so important? Too much volume can lead to barotrauma so it is important to avoid this. Also, providing too much volume results in hyperinflation of the lungs, increased intrathoracic pressure, and decreased venous blood return to the heart. Most sick patients rely on adequate preload so killing it with the BVM can really hurt them.
Volume is only part of the story though. We also have to be cognizant of the amount of pressure we deliver, the speed of the squeeze. There are a few reasons for this. When delivering breaths with a mask, as opposed to an ETT tube or SGA, air can go two places. The place it likes to go most is the lungs as there is not much resistance in that pathway. However, the lower esophageal sphincter can be overridden with only a small amount of pressure. This results in gastric distention. It only takes a short time to completely fill the stomach with air and distend it significantly. This hurts us, and the patient, in multiple ways. The first is that people tend to vomit when their stomach is filled with air. This make airway management and ventilation more challenging. Additionally, filling the stomach with air causes it to compress the diaphragm and inhibit lung expansion which further impedes ventilation. So how can you minimize this? Make sure you deliver breaths slowly, over at least two seconds, if not longer. You can also use a pop-off valve that limits the amount of pressure that can be delivered.
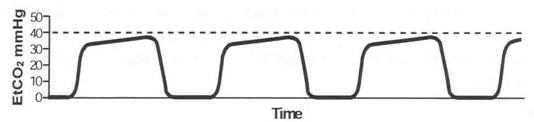
The last part of the story is the rate. Now this is where people get really excited and make their patients sicker. There are very few patients that need 40 breaths/minute. It is important to consciously maintain an appropriate ventilatory rate. This is easily done by monitoring ETCO2. Shoot for a number that is appropriate for the patient condition, normal is 35-45 mmHg. If you’re going to fast it will decrease, too slow and it will increase.
In summary, deliver small volumes, with low pressures, at slower rates and this will ultimately benefit your patient.
3. Use airway adjuncts
Basic airway adjuncts can go a long way in the difficult to ventilate patient. In reality though, if you use all the tips in this post, you usually will not need any basic adjuncts. However, some people have large tongues and extra soft tissue that cannot be displaced with simple positioning and jaw thrust. In completely obtunded or unresponsive patients it is prudent to insert an adjunct initially to maximize chances of successful ventilation. Inserting a properly sized nasopharyngeal airway or oropharyngeal airway helps to bypass the tongue and create a passage for ventilation. Keep in mind the device must be properly sized so that it reached past the base of the tongue. If it does not reach far enough then all it is doing is acting as an obstruction and making ventilation more difficult. Also, keep in mind that inserting either device can illicit the gag reflex leading to vomiting.

4. PEEP
All aspects of airway management and assisted ventilation involve PEEP. Historically, PEEP use with a BVM has been minimal but recently it has become standard of care. PEEP (positive end expiratory pressure) is the amount of pressure that is maintained in the lungs and airways at the end of exhalation. This pressure is maintained by the glottis and upper airway structures in normal physiology. This pressure is what allows the alveoli to remain inflated and not collapse during the exhalation phase. When alveoli collapse, also known as atelectasis, there are a few adverse  effects. The first is that they become significantly harder to recruit and inflate. Once an alveoli is collapsed it requires much more pressure to reinflate it. Alveoli that are collapsed cannot perform gas exchange leading to worsened oxygenation and ventilation. Additionally, when atelectasis occurs alveoli become damaged, less effective, and may rupture. This is especially true in patients with lung disease. Because of this, a PEEP valve should be used on all BVMs and adjusted individually for each patient. The typical setting for healthy lungs is 5 CMH2O but this can be increased in certain situations. Patients with pulmonary edema or other causes of physiologic shunt often require more PEEP to oxygenate and recruit lung tissue. Do not be afraid to increase PEEP if the oxygen saturation is not improving and always use at least 5 CMH2O.
PEEP can also aid in ventilation. Maintaining higher airway pressures, in combination with jaw thrust and good technique, can help keep the airway patent and maximize air movement. In order for PEEP to be effective the mask seal must be maintained at all times, even in between breaths.
Below are two videos from George Kovacs (@kovacsgj) that he developed in one of his cadaver labs. They demonstrate the incredible effects of PEEP and why it is so important.
BVM with PEEP
BVM with ETT and PEEP
5. BVM as CPAP/BiPAP
The application of PEEP via a BVM has another advantage. In the spontaneously breathing patient the BVM can be used as CPAP or BiPAP. If the mask is sealed well on the face, at least 15 lpm oxygen is flowing, and a PEEP valve is in place, the patient will receive the set amount of PEEP in the form of CPAP. Additionally, if you squeeze the bag when the patient breaths you can essentially provide BiPAP. Spontaneously breathing patients, even if minimally, often benefit greatly from only CPAP via BVM without squeezing the bag. This decreases the risk of gastric insufflation while providing support to the patient’s own respiratory drive.
Also, placing a nasal cannula under the mask at 15 lpm to provide additional oxygenation. It also generates additional airway pressure which supports the generation of PEEP. This is an excellent technique to use for preoxygenation prior to intubation without having to setup a CPAP or BiPAP machine.
Video below, also from George Kovacs, demonstrates this technique.
PEEP as CPAP
6. Add a nasal cannula
The nasal cannula has become a mainstay of airway management. Oxygenation through the nose is significantly easier and more effective than through the mouth. Adding a nasal cannula at 15 lpm or greater under the BVM has great benefit. It increases the overall FiO2 delivered and it aids in generating airway pressure when combined with a PEEP valve.
You can also give apneic CPAP during the apneic period of RSI. Patients who require PEEP to oxygenate should have it maintained for as long as possible without interruption. Once the airway pressure decreases the alveolar recruitment generated by the PEEP is lost. But, during RSI, we often try to avoid ventilating during the apneic period for fear of regurgitation. PEEP is usually generated by breathing or ventilating but is typically lost during apnea. However, adding the nasal cannula allows PEEP to be maintained as it provides flow inward which increases airway pressure. With this, you can maintain your BVM mask seal during the apneic period and help maintain airway pressure without ventilating.
7. End-tidal CO2
ETCO2 should be used on all patients who are obtunded or have respiratory distress. It is an invaluable tool for monitoring respiratory status. It can be done with a nasal cannula type device or in-line device. An in-line ETCO2 adapter can be placed between the mask and the BVM adapter in the same way it would be placed on an ETT. Maintain a good mask seal and you will get a nice ETCO2 waveform to help guide your ventilation. If you are not getting a waveform this is indicative of poor mask seal or lack of air movement through the airway. If this occurs adjust mask seal and ensure the jaw is being pulled forward.
Summary
The BVM is a difficult device to master. Whenever you use it be sure to consciously consider HOW you are using it. Position the patient properly, upright and ear-to-sternal notch. Always make sure to maintain a constant mask seal. Deliver small, low pressure breaths. Use airway adjuncts as needed. Add a PEEP valve to maximize alveolar function and consider using the BVM for CPAP or BiPAP. Add a nasal cannula with 15 lpm O2. And finally, always use ETCO2 when ventilating a patient.
Remember: if this guy can do it, so can you.
Like us on Facebook!
Questions, comments, feedback?
theresusroom@gmail.com
@amerelman on twitter
 this better than anyone, having examined 20 cadaveric airways per month for the past 16 years in addition to clinical research. He coined the term “coffin position” to describe the detriment of having your patient supine. Cannot Oxygenate Face Flat in Neutral position. There are a few reasons this is true and it is important to understand them. Not only will it help improve patient outcomes but it will make you better at managing airways.